How to Avoid Blisters While Hiking: A Beginner’s Guide
Shuffle back to the car. If you have felt that hot, raw spot on the back of your foot, you already know why so many hikers search for how to avoid blisters while hiking. The fix comes down to a few simple habits with your boots, socks, and feet, and I will walk you through all of them.
How to Avoid Blisters While Hiking
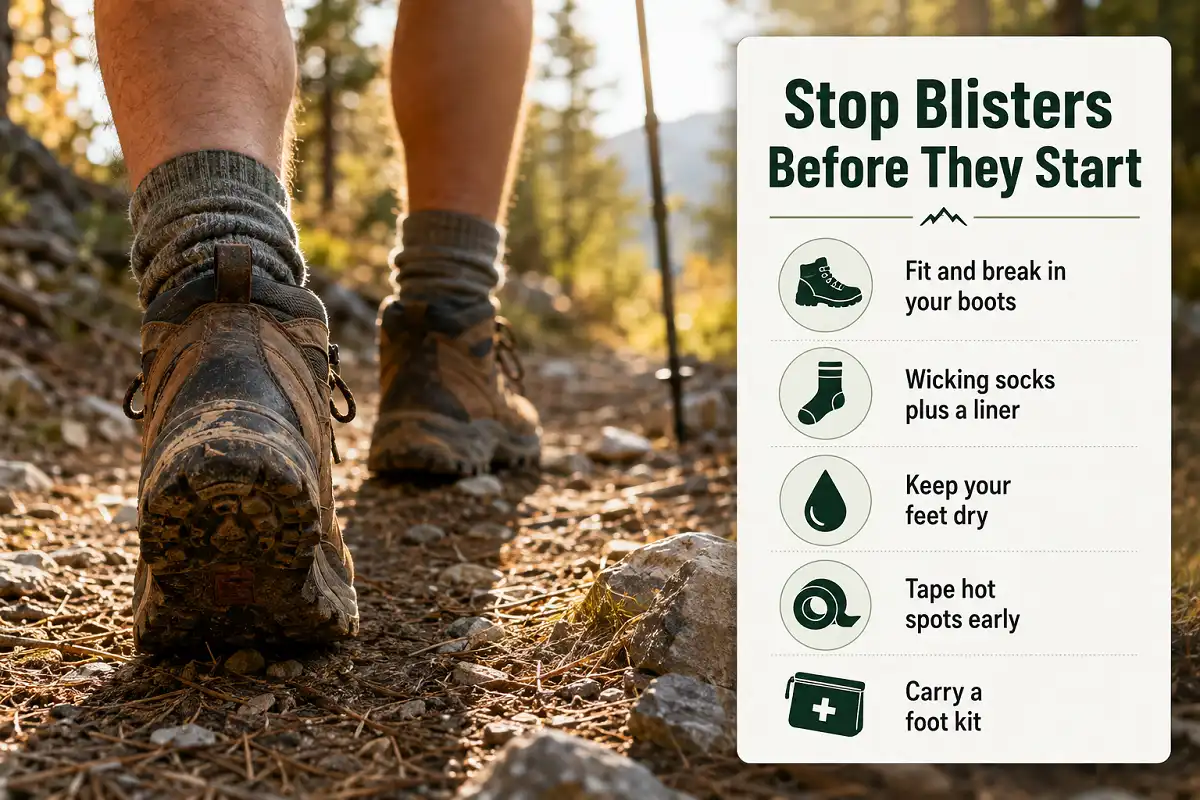
Here is how to avoid blisters while hiking in plain terms. Cut down the three things that create blisters: friction, moisture, and heat. Wear boots that fit and are broken in. Pair moisture-wicking socks with a thin liner. Then treat any hot spot the second you feel it, and carry a small foot kit for the miles when prevention slips.
What Causes Hiking Blisters
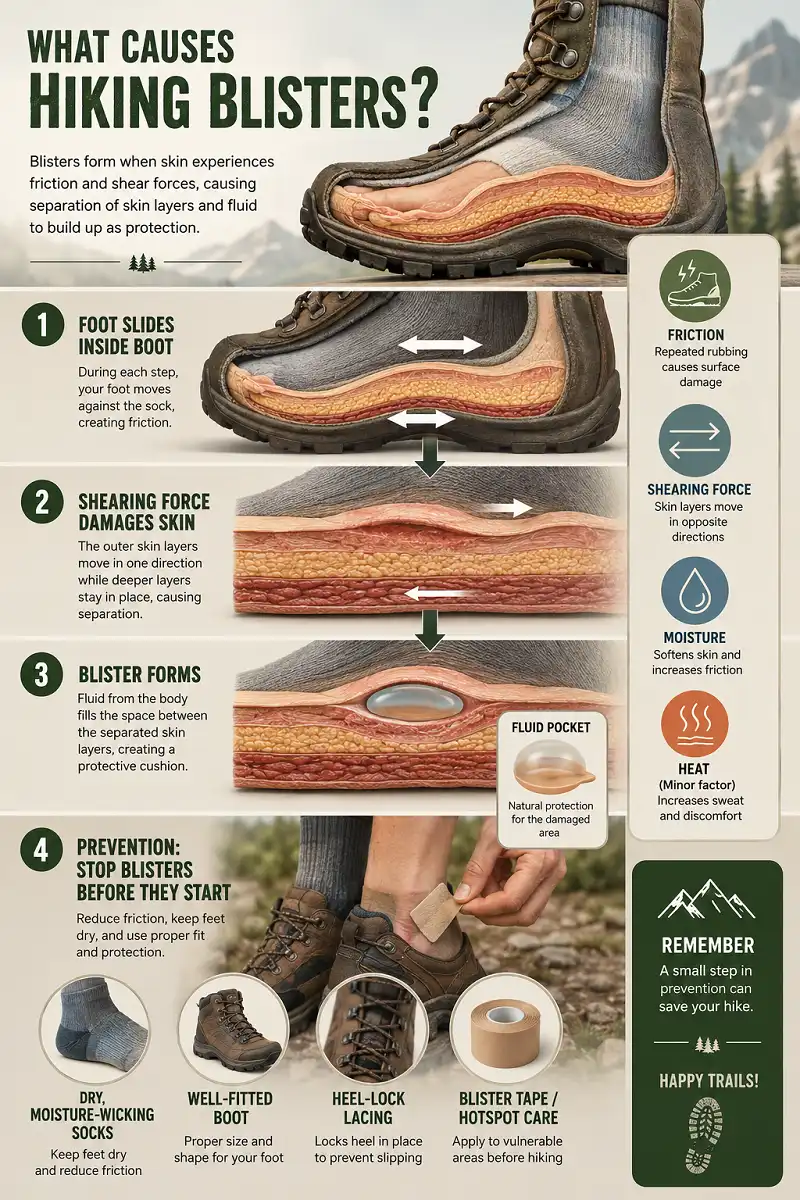
Blisters come from more than plain rubbing. When your foot slides against a sock or boot, the outer layers of skin get dragged one way while the deeper layers stay put. This shearing force separates the layers, and your body fills the gap with fluid to protect the raw skin below. That fluid pocket is the blister.
Moisture makes it worse, because damp skin is softer and grips the sock harder, so friction climbs. Heat plays a smaller part, though a warm boot speeds the whole process up. If you want the medical version, this look at what happens under the skin when a blister forms lines up with what podiatrists describe.
Keep your heel and foot stable inside the boot.
Use moisture-wicking socks and change damp pairs.
Choose breathable footwear and vent your feet.
Stop as soon as you feel warmth or tenderness.
Be ready to protect trouble spots on the trail.
That makes the plan simple. Understanding that mechanism is the first step in how to avoid blisters while hiking. So how to avoid blisters while hiking comes down to three moves: reduce the sliding, keep your feet dry, and catch trouble early.
Start With Boots That Fit and Are Broken In
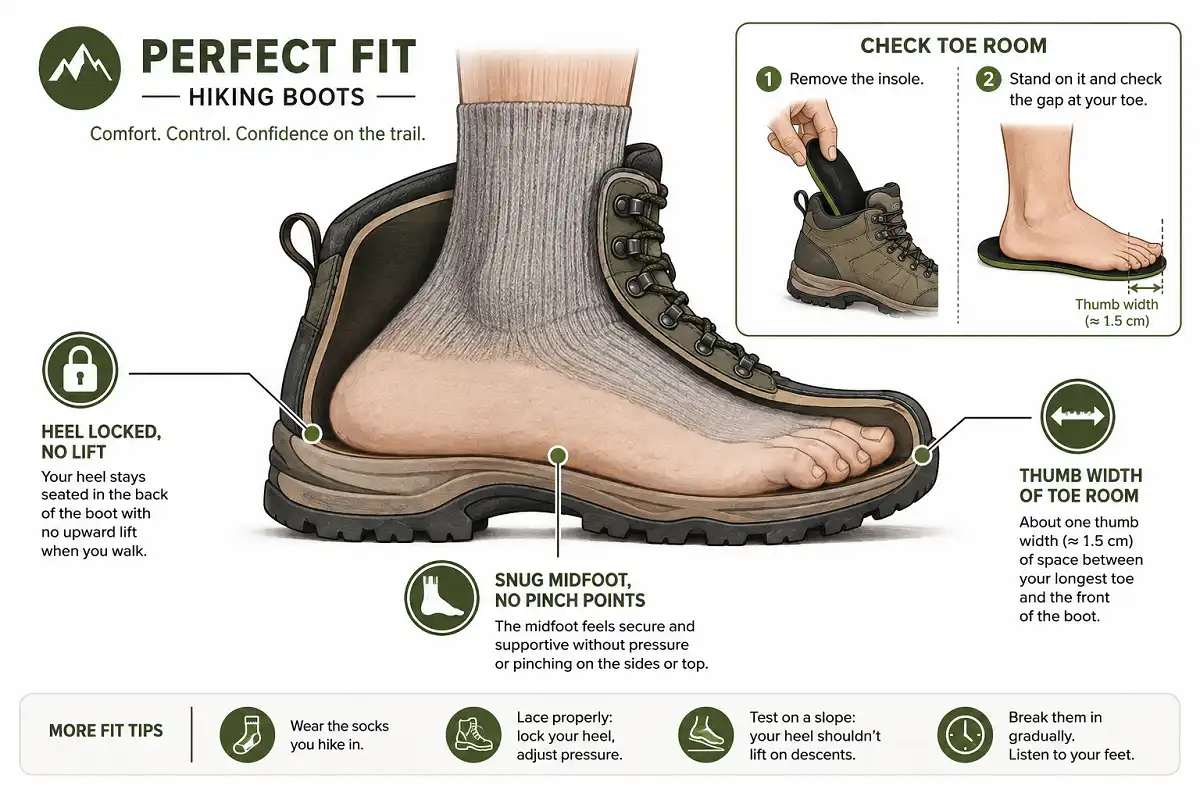
Your boots are the foundation, so getting the fit right prevents more blisters than anything else. A good hiking boot holds your heel snug, gives your toes room to wiggle, and puts no sharp pressure on any one spot.
Give Your Toes Room
Pull the insole out, stand on it, and look at the gap in front of your longest toe. You want about a thumb’s width of space, because your feet swell on the trail and slide forward on descents.
Fit alone is not enough, though. New boots need breaking in before a big day out. I wear mine around the house and on short walks first, adding distance slowly until they feel like part of my foot. Never debut fresh boots on a long hike.
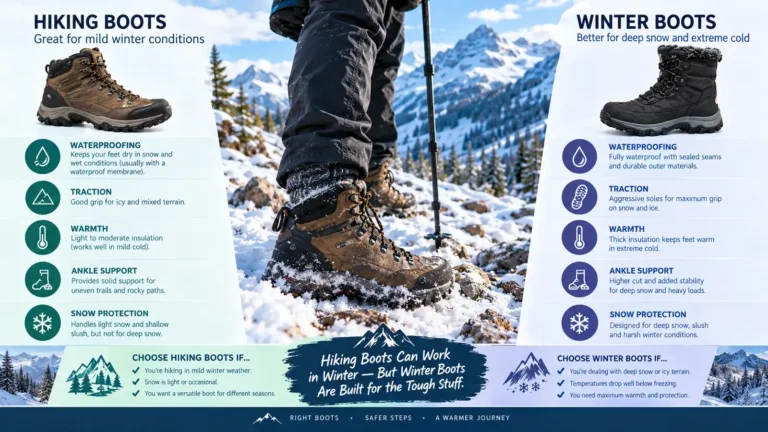
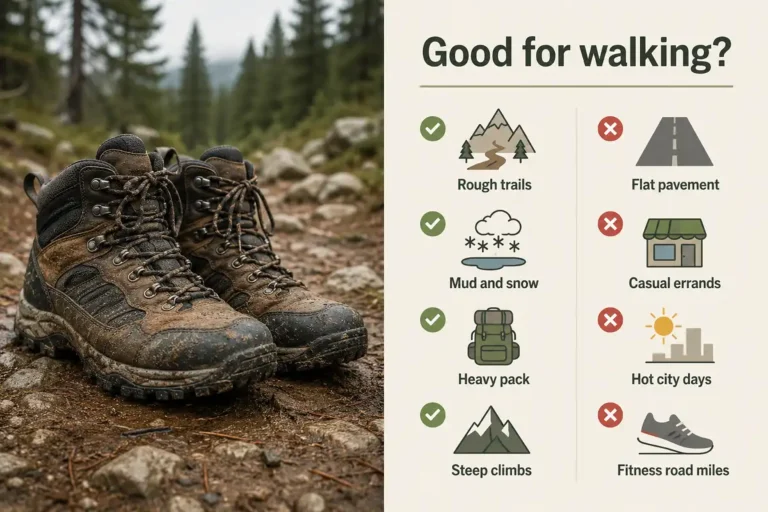
Weight matters too. For easy, flat trails, a light boot or even a trail runner breathes better and dries faster, which cuts moisture. Heavier leather boots make more sense on rough or snowy ground.
If you are weighing options, my notes on how hiking boots hold up for everyday walking and this look at whether a popular trail brand is worth it can point you in the right direction.
Whatever you pick, the fit rules stay the same. Nailing that fit is the biggest single step in how to avoid blisters while hiking.
Lace Them So Your Heel Stays Put
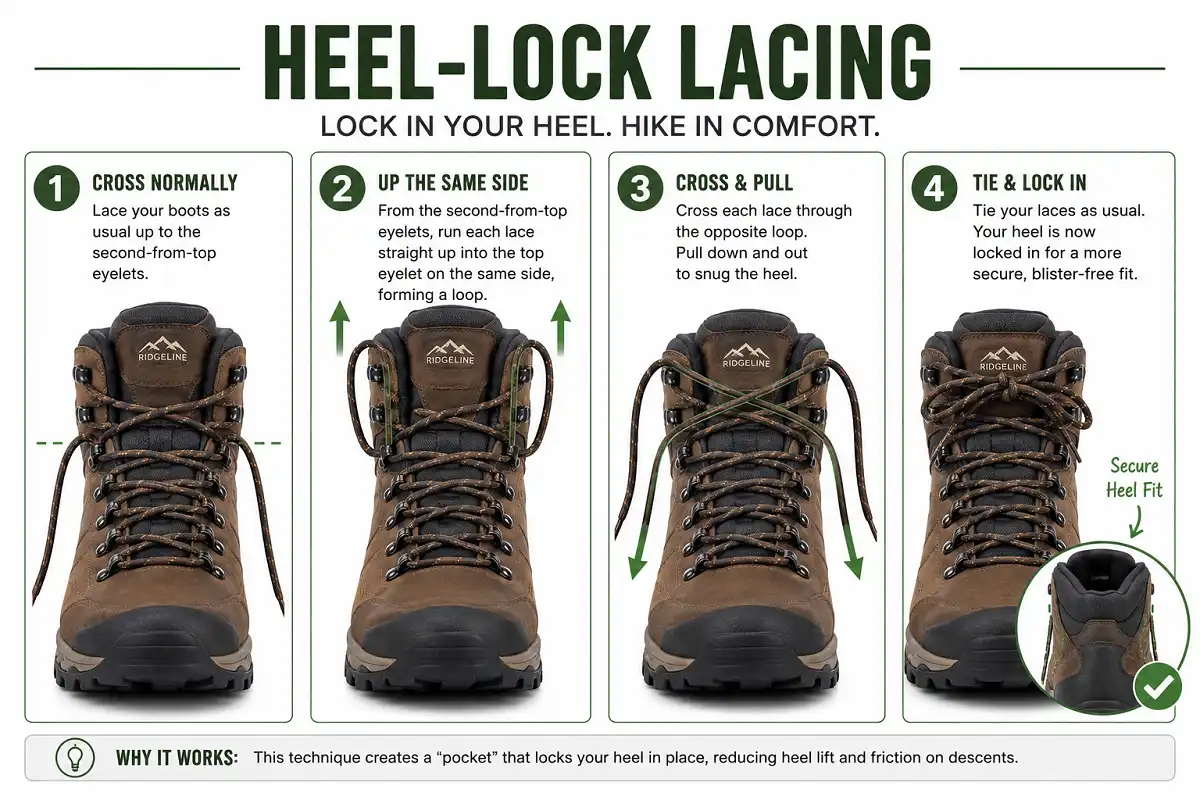
A slipping heel rubs, and a rubbing heel blisters, so lacing is a small skill worth learning. The trick most hikers miss is the heel-lock, sometimes called a lace-lock. It uses the extra eyelets at the top of your boots to hold your heel down.
How I Tie It
- Lace up normally until you reach the second-to-last eyelets.
- Instead of crossing over, run each lace straight up into the top eyelet on the same side, making a small loop.
- Cross each lace through the opposite loop, then pull down and out.
- Tie your usual knot. Your heel should feel locked in place.
Feet swell over the miles, so I stop and retie once the trail steepens. Snug beats tight, though. Laces that dig in cause their own problems. Locking your heel down is a quiet but important part of how to avoid blisters while hiking.
Get Your Sock System Right
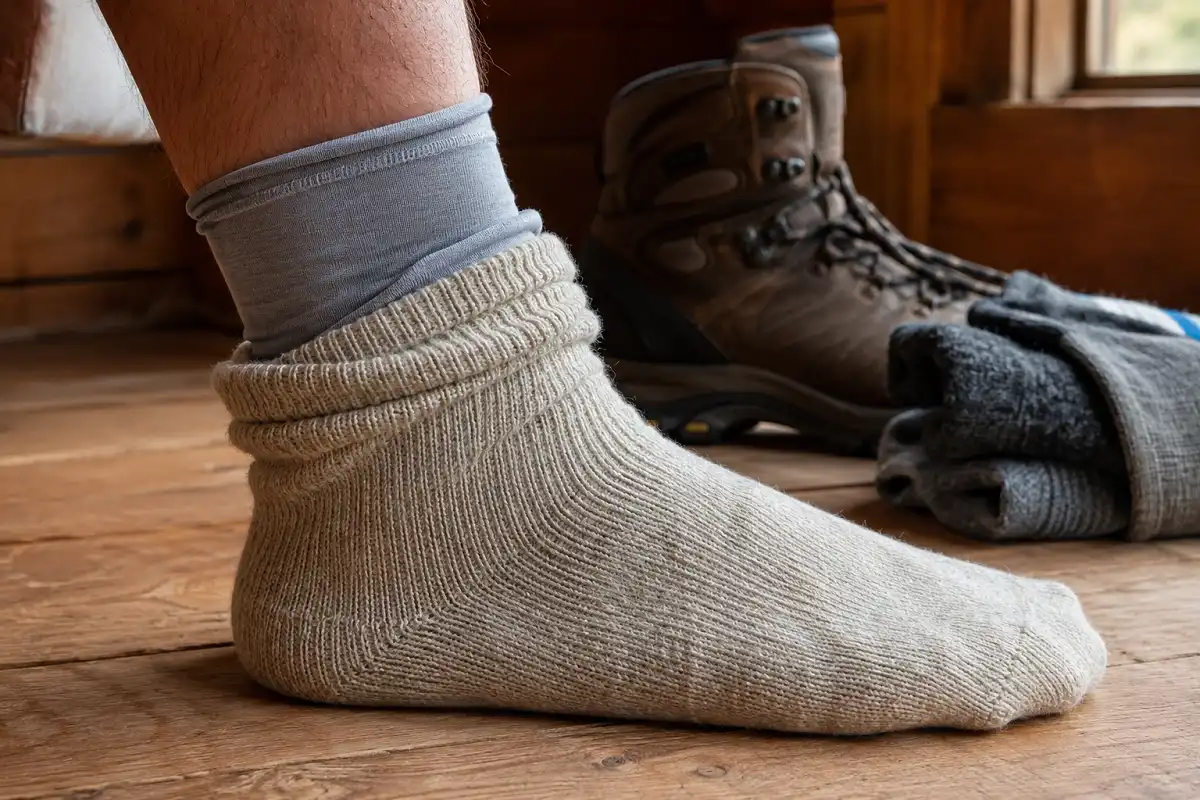
When people ask me how to avoid blisters while hiking, socks are the first thing I bring up. First, drop cotton entirely. Cotton soaks up sweat, holds it against your skin, and softens your feet until they blister easily.
Choose Moisture-Wicking Fabric
Choose merino wool or synthetic socks instead. Both pull moisture away and dry faster.
Try Two Sock Layers
A thin liner under your main hiking sock lets the fabrics slide against each other instead of against your skin.
Keep Socks Smooth
Avoid wrinkles and bunched seams because a fold in the fabric becomes a pressure point.
Carry a Dry Spare
Swap socks halfway through longer hikes and keep the spare in an outside pocket.
Add Cushioning
Thicker cushioned socks can absorb some of the shearing motion with every step.
If you are curious how much difference the right socks really make, I broke that down in a separate guide.
Keep the spare in an outside pocket so it stays dry. A smart sock system sits at the center of how to avoid blisters while hiking.
Keep Your Feet Dry
Dry Feet Blister Less
Sweat is the usual culprit, so small moisture-control habits can make a major difference on long hikes.
Before I lace up, I dust my feet with foot powder or rub on a foot antiperspirant, which slows sweating at the source. On hot days, I roll my sock tops down over the boot collar to vent heat, a trick some hikers call the chimney effect.
Water crossings and rain need extra care. Wet skin wrinkles and softens, and soft skin tears easily. So after a stream crossing, I dry my feet and change into the spare socks whenever I can.
If the forecast looks wet, gaiters and quick-drying socks earn their place.
Dressing light and choosing breathable footwear helps your feet run cooler.
Dry feet are a huge piece of how to avoid blisters while hiking.
How to Avoid Blisters While Hiking by Cutting Friction
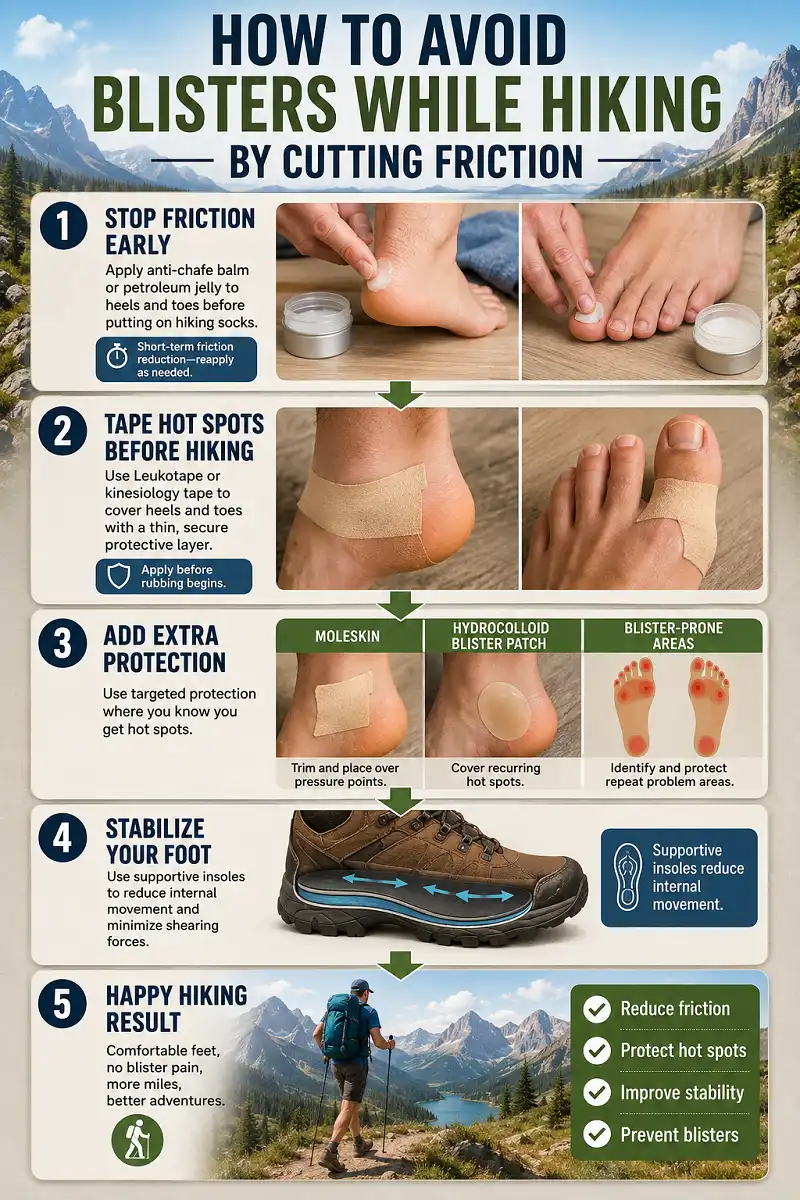
You can attack friction directly, which pays off on routes where you always seem to blister. Anti-chafe balms and even plain petroleum jelly reduce rubbing for a while. They do wear off, though, and they can trap grit, so I treat them as a short-term helper rather than a full fix.
Friction Helpers
- Anti-chafe balm
- Petroleum jelly
- Short-term protection
- Can wear off over time
Preventive Protection
- Leukotape
- Kinesiology tape
- Moleskin
- Hydrocolloid patches
Taping works better for me. If you know your trouble spots, cover them before you start. Options include:
- Leukotape or kinesiology tape for a thin, tough layer that stays put for miles.
- Moleskin cut slightly larger than the sore area.
- Hydrocolloid blister patches on skin that flares up again and again.
Supportive insoles also steady your foot inside the boot, which lowers the shearing motion that starts blisters. For me, taping plus the right insole solved heels that used to rub every trip.
Targeting known hot spots ahead of time is a proven way of how to avoid blisters while hiking.
Handle Hot Spots the Moment You Feel Them
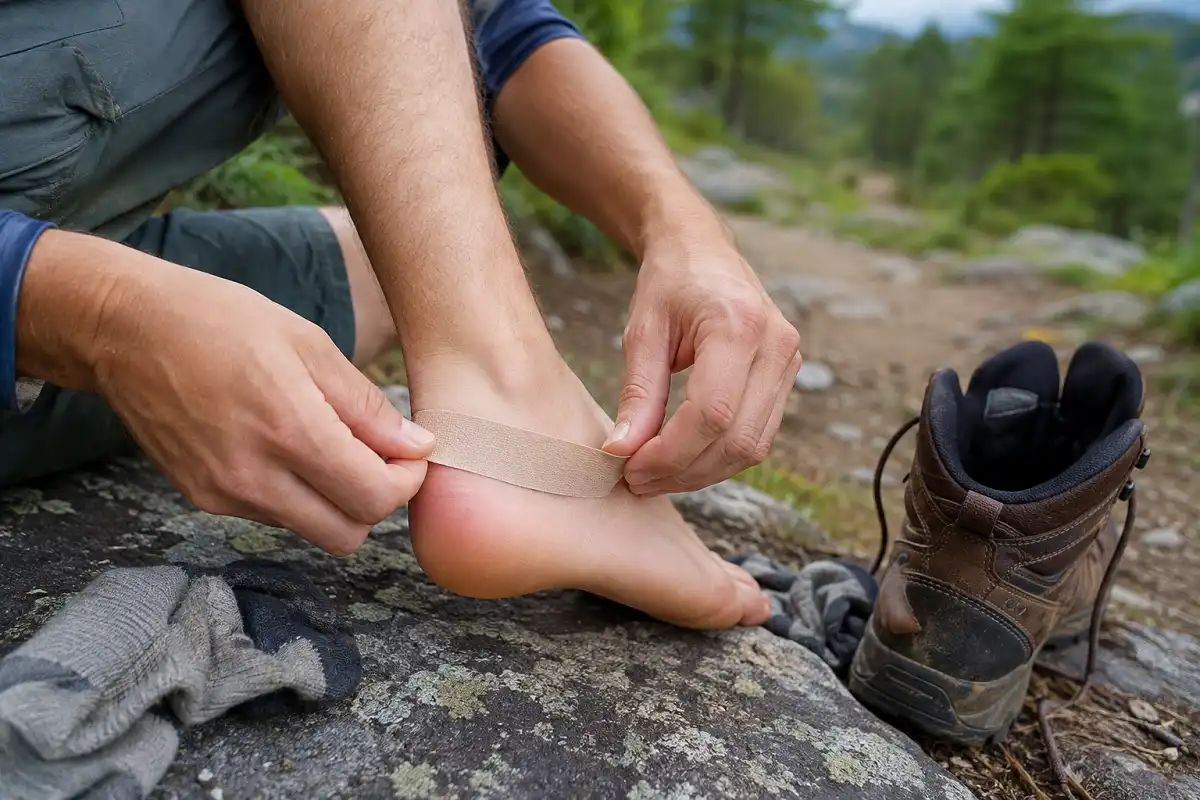
Stop at the First Sign of Trouble
If you remember one thing about how to avoid blisters while hiking, make it this. The single best on-trail habit is stopping the instant a hot spot shows up.
A hot spot is that warm, tender patch that comes right before a blister. Catch it there, and you avoid the blister entirely.
Resist the urge to push on to the next viewpoint. Sit down, pull off the boot and sock, and dry the skin. Then cover the spot with tape, moleskin, or a blister bandage before you keep going.
Two quiet minutes on the trail have saved me from days of sore feet. Fast hot-spot care is the most underrated part of how to avoid blisters while hiking.
Keep Grit and Debris Out
Small stones and sand cause big friction, so keeping them out of your boots matters more than it sounds. A single grain of sand under your heel grinds with every step.
Gaiters seal the gap between your boots and pants and block trail debris.
Stop and remove sand or stones as soon as you feel something inside.
Tie your laces in a double knot so they do not loosen and allow your foot to shift.
Keeping debris out is an easy win in how to avoid blisters while hiking.
Build Up Your Feet and Your Mileage
Tougher, better-conditioned feet blister less, so building them up pays off. Skin adapts to regular use. If you walk often, your feet slowly toughen where boots tend to rub.
So I ramp up distance gradually rather than jumping straight to a big hike. Conditioning is the slow, steady side of how to avoid blisters while hiking.
Long climbs and steep descents grind at your feet hardest, and knowing how much elevation your route packs in helps you plan an honest pace.
Toenails deserve a mention too. Long nails jam against the toe box on downhills, which brings bruised nails and toe blisters. Trim them straight across before a hike.
If you are newer to all this and building your first routine, my beginner’s walk-through of getting out on the trail covers the basics that keep those early miles comfortable.
What to Do if a Blister Forms
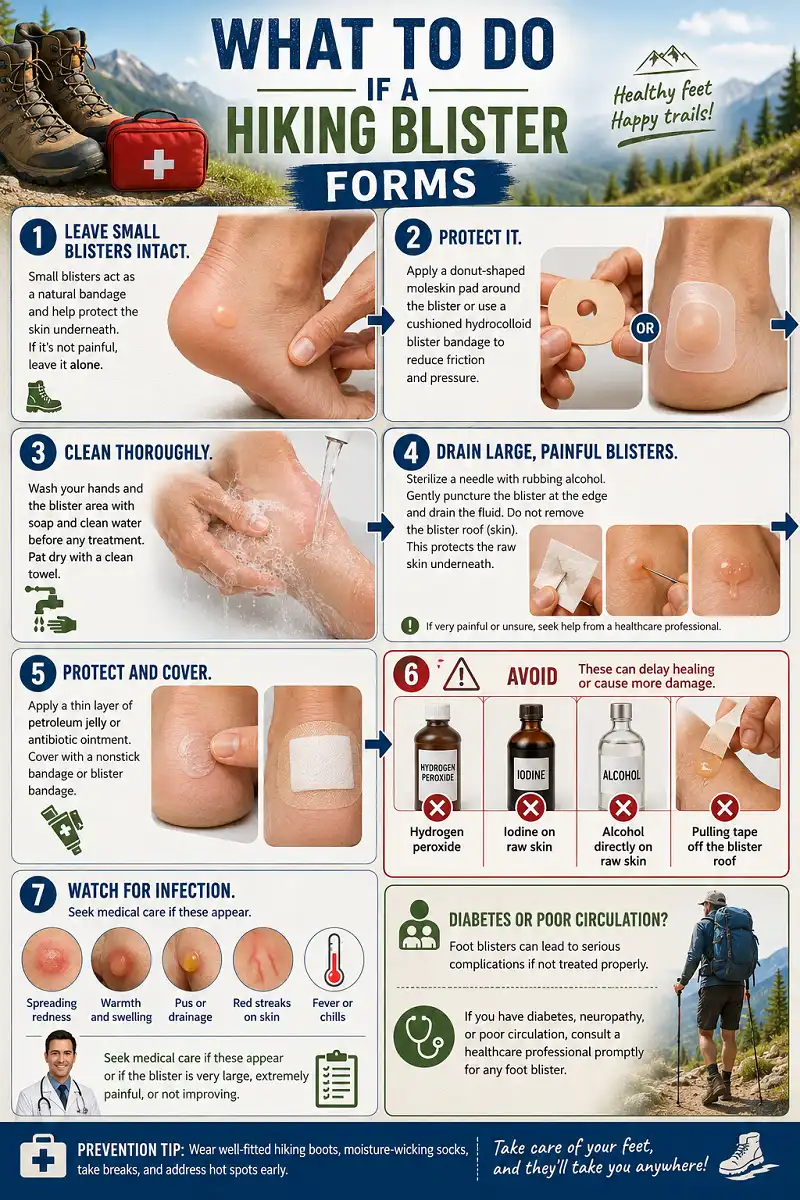
Sometimes a blister wins despite your best effort. So how to avoid blisters while hiking also means knowing how to handle one when it happens.
For an intact blister that is small and not too painful, leave it alone. The skin on top acts as a natural barrier against infection, and the fluid inside protects the raw layer while it heals.
Protect Small, Intact Blisters
Cover the blister with a doughnut of moleskin, with the hole centered over the blister, or use a cushioned blister bandage. Avoid unnecessary popping when the blister is small and manageable.
Draining is a last resort, not a first move. Still, you can carefully drain a large or very painful blister, or one that will clearly pop on its own.
When a Blister Needs Attention
- Wash your hands and the blister with soap and water.
- Sterilize a needle with rubbing alcohol.
- Prick the blister near its edge in a couple of spots, then gently press the fluid out.
- Leave the top skin in place. Do not peel it off.
- Apply a thin layer of petroleum jelly or antibiotic ointment, then cover with a nonstick bandage.
Skip the harsh stuff on raw skin. Hydrogen peroxide, iodine, and alcohol can slow healing, so soap and water are enough for cleaning.
If a blister has already torn open, smooth the flap back down, clean it gently, add ointment, and cover it. For blisters you need to walk on, a hydrocolloid dressing cushions the spot and holds a moist healing environment, and you can leave it on for two to three days until the edges lift.
Do not stick tape straight onto a blister roof, because pulling it off can tear the skin away.
Spreading redness, warmth, pus, red streaks, or fever are reasons to seek medical care.
Watch for infection as the skin heals. See a doctor if you notice spreading redness, warmth, pus, or red streaks running from the blister, or if you run a fever.
Anyone with diabetes or poor circulation should be extra careful and check with a professional early, since foot wounds carry more risk for them.
A Simple Foot Kit to Pack
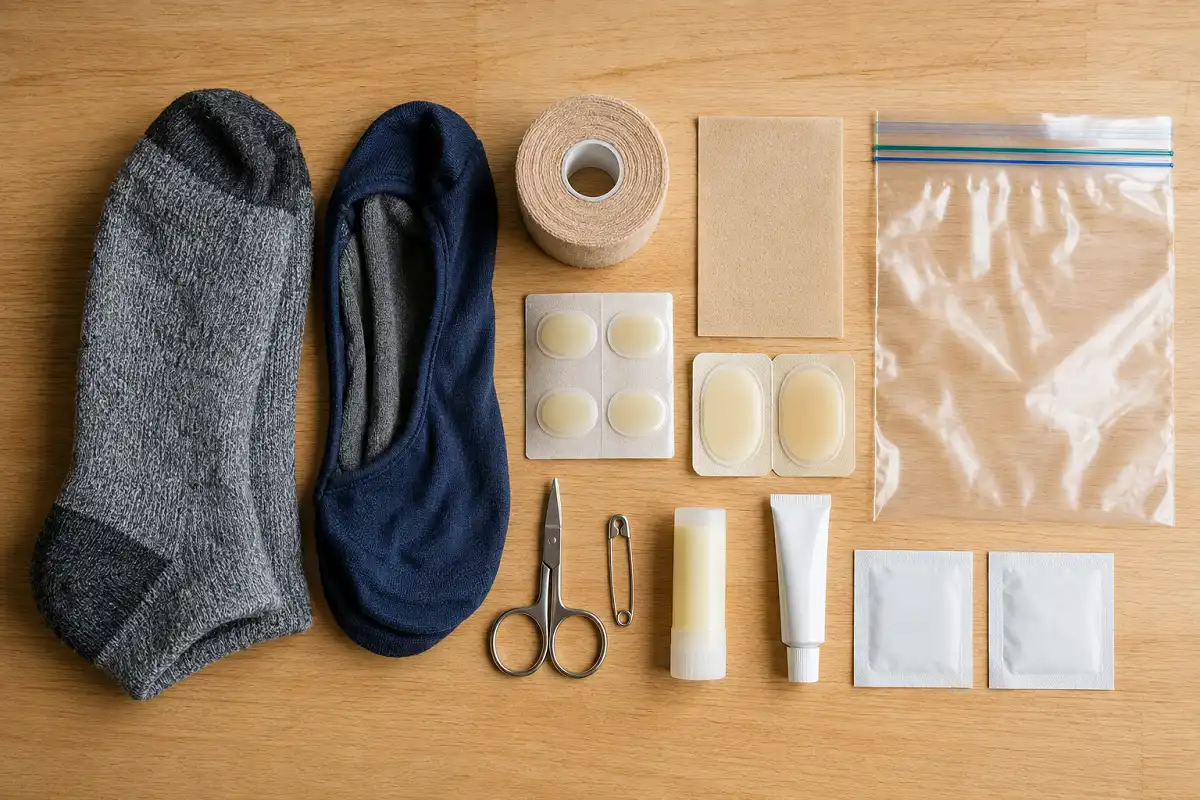
Keep a Small Foot Kit
A tiny foot kit turns a trip-ending blister into a two-minute pause, so I never hike without one.
Dry Socks
A dry spare pair plus liner socks.
Blister Tape
Leukotape or moleskin for hot spots.
Blister Bandages
A few hydrocolloid blister bandages.
Small Tools
Small scissors and a safety pin or needle.
Skin Care
Anti-chafe balm and antibiotic ointment.
Cleaning Wipes
A couple of alcohol wipes for the kit.
None of this needs to be expensive. Cheap tape and generic bandages work fine.
Final Thoughts
Blister-free hiking is a system, not a single trick. Get boots that fit and break them in, lace them to lock your heel, and run a no-cotton sock setup with a liner.
Keep your feet dry, cut friction on known trouble spots, and stop the instant you feel a hot spot. Then pack a small foot kit for the rare miss.
Do these few things, and how to avoid blisters while hiking stops being a worry and starts being a habit. In the end, how to avoid blisters while hiking is simply steady care repeated on every trip. Your feet will carry you a lot farther.
FAQs
Can beginners really learn how to avoid blisters while hiking?
Yes, and it does not take long. Learning how to avoid blisters while hiking is mostly a handful of habits: solid boot fit, a liner-and-wool sock setup, dry feet, and fast hot-spot care. Master those, and sore feet stop cutting your hikes short.
Should I pop a blister while hiking?
No, not in most cases. An intact blister protects the skin underneath and lowers infection risk, so leave small ones alone and cover them. Only drain a blister that is large, very painful, or about to burst anyway, and do it with a sterilized needle at the edge while leaving the top skin on.
Do liner socks really help prevent blisters?
Yes, liner socks help a lot. They let the liner and your main sock slide against each other, so the friction lands on fabric instead of your skin. That single change fixes heel and toe rubbing for many hikers.
Is petroleum jelly good for preventing blisters?
It helps for short hikes, but it is not a complete answer. Petroleum jelly and anti-chafe balms cut friction at first, then wear off and can trap grit over a long day. For spots that blister often, tape usually protects better and lasts longer.
Why do I still get blisters even with good boots?
Good boots are only part of the picture. Blisters also come from damp socks, poor lacing, cotton fabric, long descents, and the natural shape of your gait. So find where you rub, then attack that spot with better socks, a heel-lock lacing, and pre-taping before your next hike.
That hunt is the heart of how to avoid blisters while hiking: locate your friction, then remove it.
How long should I break in new hiking boots?
Give new boots a couple of weeks of easy wear before a big hike. Start with short walks around town, then add trail miles gradually so the leather and your feet adjust together.